
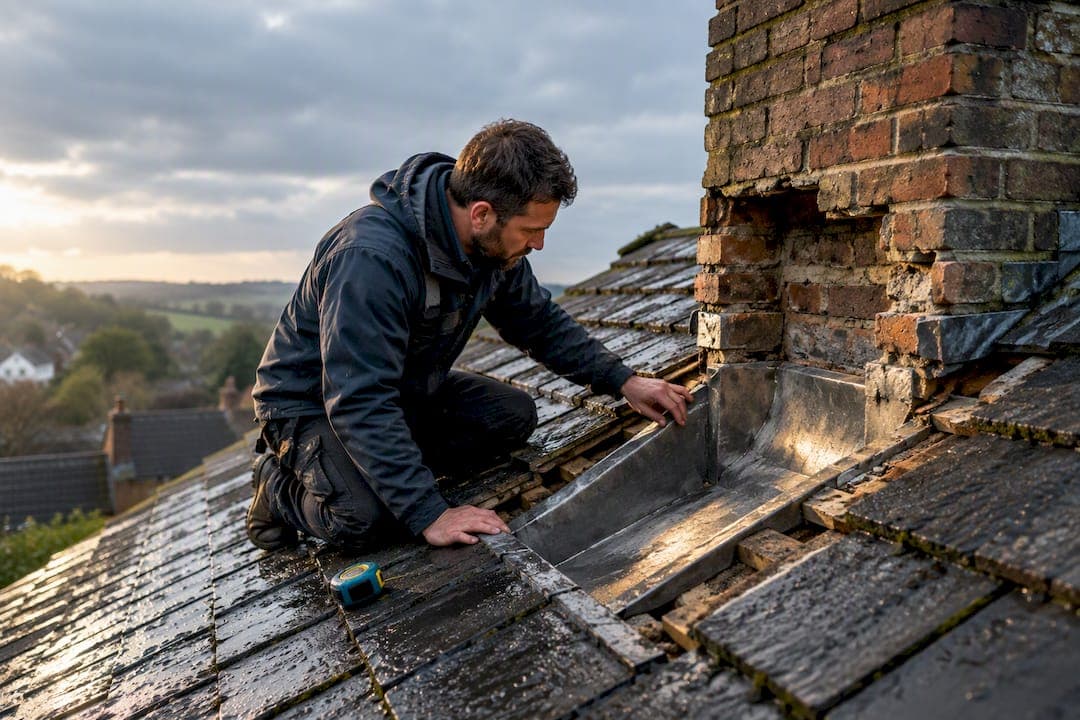
A chimney lead tray is a horizontal damp-proof layer bedded inside the stack, above roof level, that stops rainwater running down inside the brickwork or into your loft. It normally sits at least 150 mm above the lowest point where the roof meets the chimney, and retrofitting one usually means disturbing masonry. If you suspect a failed tray, photograph the leak pattern and get a proper diagnostic before agreeing to any dismantling.
TL;DR:
- Most chimney leaks are caused by issues with flashing or pointing, not the lead tray itself, which is often mistaken as the primary source of water ingress.
- Proper diagnosis involves inspecting for signs such as recurring damp patches, salt deposits, or loose mortar, and may require camera checks or exploratory openings.
- Retrofitting a lead tray on an existing chimney can be complex and disruptive, often requiring partial or full dismantling of the brickwork.
- Use of Code 4 or Code 5 lead depends on exposure and weather conditions, with the thicker Code 5 preferred for exposed or larger area applications.
- A thorough inspection and diagnostic survey must be conducted before any dismantling or replacement to avoid unnecessary costs and repairs.
Table of Contents
- How a Chimney Lead Tray Works With Flashings
- Lead Codes, Standards, and Corrosion Protection to Know
- New Installation vs. Retrofit: What Actually Changes
- Inspection Checklist: Signs Your Tray or Flashing Has Failed
- When to Call a Roofer and What to Ask Them
- A Kent Roofer's View on Getting the Diagnosis Right First
- Get a Straight Answer on Your Chimney Before Anyone Touches the Brickwork
- Sources
- FAQ
How a Chimney Lead Tray Works With Flashings
Think of the tray as the last line of defense behind everything else on your stack. Flashings, soakers, and the apron or back gutter all shed water off the roof surface. The tray catches anything that gets past them and channels it back out before it reaches your ceilings.
Where the tray sits depends on your roof and chimney. A front apron works well on a straightforward pitch where the chimney sits close to the ridge, while a back gutter suits chimneys positioned further down a long roof slope, where water volume running off the tiles is greater. Roofers weigh pitch, exposure, and whether the loft space below is used for living or storage before recommending one over the other.
The 150 mm minimum above the lowest roof intersection is the baseline most builders work to, but it is not always enough on its own. Wide chimneys or steep roofs sometimes need a second, higher-level tray to give water a shorter path out before it can pool.
A few details separate a tray that works quietly for decades from one that fails within a few winters:
- Weep holes: small gaps or perforations that let water drain from the tray onto the roof covering or into a gutter outlet, rather than sitting trapped against brickwork.
- Fall direction: the tray should slope toward its discharge point, not sit flat, so water does not linger against mortar joints.
- Overlap with flashing: the tray's edges need to tuck under the stepped or cover flashing above, not just butt against it.
Get any of these wrong at construction stage and you get a slow, invisible leak that takes years to show up as a stain on a bedroom ceiling.
Lead Codes, Standards, and Corrosion Protection to Know
Most chimney trays and flashings on a typical house use Code 4 lead, the standard weight for domestic work built to BS EN 12588. It's thick enough to resist wind lift and general wear without adding unnecessary weight to the stack. Where a chimney faces heavy weather, sits on an exposed elevation, or the flashing area is unusually large, Code 5 lead is the better call. Its extra thickness copes better with repeated thermal movement and the buffeting that comes with coastal or hilltop exposure.
One detail that catches a lot of homeowners off guard: lead buried inside mortar joints is vulnerable to a slow chemical attack from the free lime in fresh cement. Trade guidance recommends coating those buried faces with bitumen paint before bedding them in. Skip that step and you can end up with lead that looks fine on the visible surface but is thinning from the inside.
A few specification points worth checking on any quote:
- Confirm the lead code specified matches the exposure of your chimney, not just the cheapest option on the invoice.
- Look for correct overlaps and fixing with wedges and clips rather than nails, which allow the lead to expand and contract with temperature.
- Ask whether buried sections received a bitumen coating before the mortar went on.
New Installation vs. Retrofit: What Actually Changes
Chimney trays are almost always installed while the stack is being built, bedded between courses of brick as the mason works upward. That's the easy scenario. The tray sits exactly where it needs to before anything is finished around it, with no need to disturb existing work.
Retrofitting is a different job entirely. A missing or failed tray on an existing chimney is often buried inside brickwork that was never designed to come apart cleanly, so fixing it can mean partial or full dismantling of the stack. That is disruptive, and it is also why an internal leak on its own is not proof the tray has failed. The damp could be coming from cracked pointing, a split flashing, or saturated brickwork with the tray doing its job perfectly well underneath.
A responsible contractor works through a scale of intervention rather than jumping straight to a rebuild:
- Diagnostic survey to identify the actual water path, often the cheapest and least disruptive step.
- Flashing repair or repointing where the fault sits above the tray line, which is common and far less invasive.
- Partial dismantle to expose and inspect the tray directly when other causes have been ruled out.
- Full rebuild of the affected section, reserved for confirmed tray failure or structural chimney problems.
Each step up that list adds cost and disruption, so it pays to ask exactly which step you are being quoted for.
Inspection Checklist: Signs Your Tray or Flashing Has Failed
Most tray problems announce themselves indoors before you ever see anything wrong on the roof. Watch for these after a heavy rain spell:
- Damp patches or discoloration on ceilings and walls near the chimney breast, especially ones that appear or worsen during and after rain.
- White, powdery salt deposits on brickwork or plaster, a classic sign of water moving through masonry.
- Loose, crumbling, or missing mortar joints (pointing) around the stack.
- Displaced, cracked, or slipped tiles near the chimney base.
- Visible splits, lifting edges, or gaps in the flashing where it meets the brickwork.
None of these signs confirms the tray itself has failed, since the tray is usually buried and can't be checked by eye from the roof. Saturated brickwork can carry water past a perfectly sound tray, and lichen growth or acid rain exposure can corrode exposed lead over years without anyone noticing until a leak appears.
Pro Tip: Photograph every stain with a coin or ruler in the frame for scale, and note the date, the weather in the days before, and which side of the chimney the mark is nearest. That timeline is often what lets a roofer rule out three possible causes in one visit instead of three separate call outs.

When to Call a Roofer and What to Ask Them
Call promptly if a stain keeps returning after dry spells, if damp is spreading rather than staying in one patch, or if you can see daylight through gaps in the flashing. Recurring leaks that seem to get worse with each storm deserve an emergency roof leak response rather than a wait and see approach.
Before agreeing to any work, ask your contractor these three questions:
- Will you check and repair the visible flashing and pointing before considering the tray itself?
- What method will you use to confirm a tray failure, such as camera inspection or a small exploratory opening, rather than a full dismantle on assumption?
- Can you show me the specific evidence, photos or otherwise, that points to the tray rather than another cause?
Ask for a written diagnostic report with photos and a scope of options that spells out the disruption and rough cost of each stage, from a simple flashing repair up to a full rebuild.
A Kent Roofer's View on Getting the Diagnosis Right First
Most avoidable chimney costs in Kent trace back to skipping the diagnostic step. A leak gets blamed on the tray, the stack comes down, and the actual cause, a split flashing or a cracked capping, turns out to have been fixable in an afternoon.
At Jhroof, that's why every chimney call starts with looking at what's actually failing before touching the brickwork. Family-owned and insured for over a decade of work across Kent, we back every diagnosis with photos and a written explanation, not a guess dressed up as certainty. If a contractor tells you the tray has failed, hold that claim against the checklist above. If it doesn't match, ask them to show their working.
— Gabbi
Get a Straight Answer on Your Chimney Before Anyone Touches the Brickwork
A misdiagnosed chimney leak can turn a flashing repair into an unnecessary rebuild, and that gap in cost is exactly where Jhroof's diagnosis-first approach pays off. We check flashings, pointing, and tile alignment before we ever discuss dismantling, and every visit comes with a free, no-obligation quote so you know the real scope before committing to anything.

Our team covers Ashford, Canterbury, Folkestone, Maidstone, and the surrounding parts of Kent, with a 24 hour emergency response for leaks that can't wait until morning. If your damp patch is one you have been watching for weeks, or one that showed up overnight, browse our chimney and leadwork repair services and request a quote today so a proper diagnosis, not another guess, is the next thing that happens to your roof.
Sources
Readers who want the underlying technical detail can check the LABC Warranty technical manual on chimneys and flues for siting and material standards, the Kytun lead chimney tray datasheet for product specifications, DIY Doctor's chimney flashing guide for retrofit context, the CIPHE insight guide to sheet lead weatherings for lead-working technique, and Abbey Metals' installation guidance for fixing methods. Every technical claim in this guide traces back to one of these sources.
- LABC Warranty technical manual — Section 13: Chimneys and Flues
- DIY Doctor — Chimney flashing: lead DPC tray
- Checkatrade — What to do if your chimney leaks?
- Abbey Metals — How to install lead flashing (installation guidance)
FAQ
What Is a Chimney Lead Tray Exactly?
It's a horizontal lead barrier bedded inside the chimney, usually at least 150 mm above the lowest roof intersection, that stops water traveling down through the brickwork into the roof space below.
How Do I Know if My Tray Has Failed?
Recurring damp stains, salt deposits, and loose pointing near the chimney breast are the main visible signs, but since the tray is buried, none of these confirms tray failure on its own. A camera inspection or targeted exploratory opening is the only reliable way to check.
Can a Lead Tray Be Repaired Without Rebuilding the Chimney?
Often, yes, since most leaks trace back to flashing or pointing above the tray rather than the tray itself. A full rebuild is only needed when a diagnostic survey confirms the buried tray has genuinely failed.
What Lead Grade Should My Chimney Tray Be Made From?
Code 4 lead built to BS EN 12588 is standard for most domestic chimneys, while Code 5 suits exposed sites or larger flashing areas that face more weathering.
How Much Does Jhroof Charge for Chimney and Leadwork Repairs?
Pricing depends on the scope of work, from a straightforward flashing repair to a full stack rebuild, so current chimney and leadwork prices are available through a free, no-obligation quote. A single tile repair starts from £150 as a comparable baseline for smaller jobs.